クイックスタートガイド
数分で pni501 (v0.1.4) の導入から初回レポート生成までを体験できます。本ガイドでは、CLI のインストール、対象リポジトリでの .pni/ 初期化、Pre-Flight 準備ゲートの確認、そしてステートフル Pull-Push ワークフローループを実行して7軸スコア JSON と7章構成 A4 PDF レポートを生成するまでの手順を解説します。
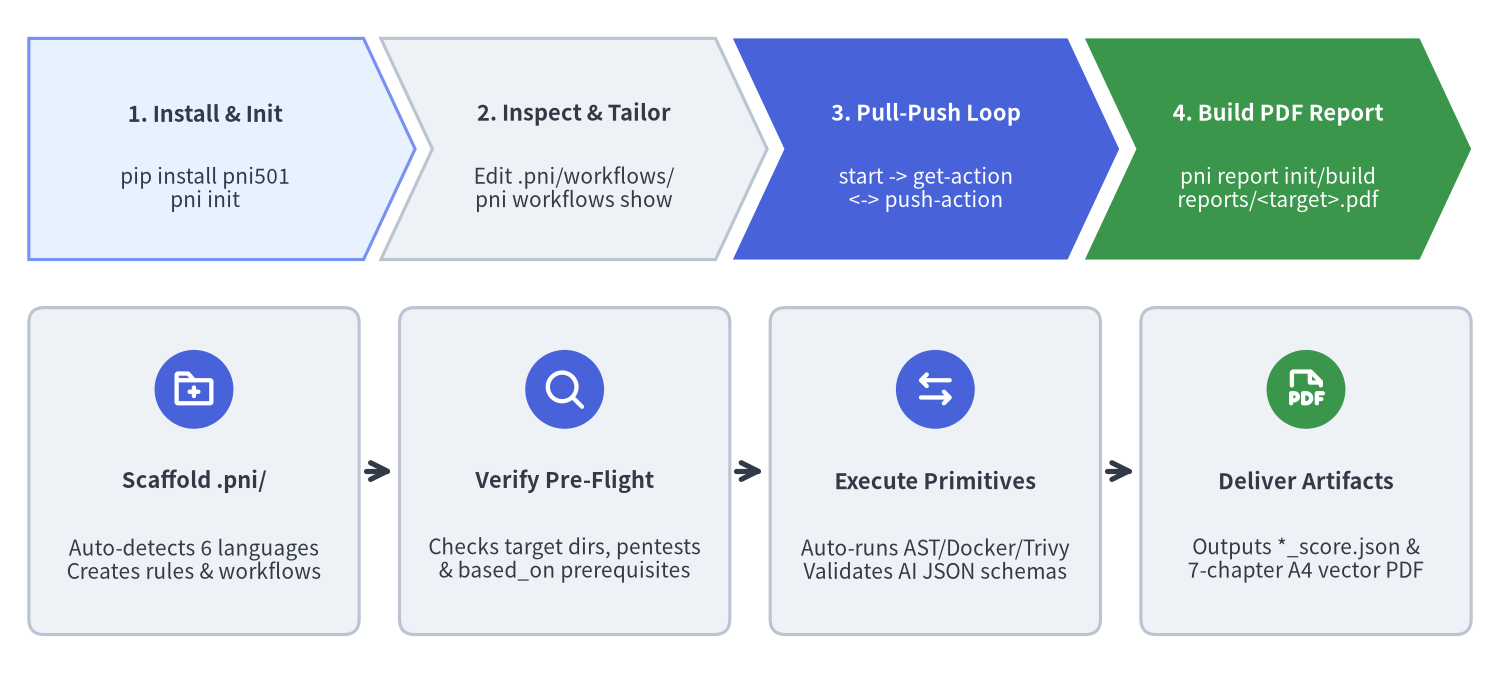
Source Code
from drawlib.canvas import save, setup
from drawlib.icons import phosphor
from drawlib.smartarts import CardList, ChevronProcess
from drawlib.styles import Styles

setup(width=156, height=70, dpi=150)

pipeline = ChevronProcess(
    style=Styles.PrimaryNeutral,
    text_style=Styles.DarkBold.patch(text_size=10.5),
    description_style=Styles.Dark.patch(text_size=10.0),
    corner_angle=65.0,
    spacing=1.8,
    flat_left_end=True,
)
pipeline.add(
    "1. Install & Init",
    description="pip install pni501\npni init",
)
pipeline.add(
    "2. Inspect & Tailor",
    description="Edit .pni/workflows/\npni workflows show",
    style=Styles.Neutral,
)
pipeline.add(
    "3. Pull-Push Loop",
    description="start -> get-action\n<-> push-action",
    style=Styles.PrimaryFlat,
    text_style=Styles.WhiteBold.patch(text_size=10.5),
    description_style=Styles.White.patch(text_size=10.0),
)
pipeline.add(
    "4. Build PDF Report",
    description="pni report init/build\nreports/<target>.pdf",
    style=Styles.SuccessFlat,
    text_style=Styles.WhiteBold.patch(text_size=10.5),
    description_style=Styles.White.patch(text_size=10.0),
)
pipeline.draw(xy=(3.0, 43.0), width=150.0, height=23.0)

commands = CardList(
    style=Styles.Neutral.patch(shape_r=1.6),
    text_style=Styles.DarkBold.patch(text_size=10.5),
    description_style=Styles.Dark.patch(text_size=10.0),
    badge_shape="circle",
    badge_style=Styles.PrimaryFlat,
    badge_text_style=Styles.WhiteBold.patch(text_size=10.0),
    icon_style=Styles.WhiteBold,
    direction="horizontal",
    show_arrows=True,
    arrow_style=Styles.DarkBold,
    spacing=3.0,
)
commands.add(
    "Scaffold .pni/",
    "Auto-detects 6 languages\nCreates rules & workflows",
    icon=phosphor.folder_plus,
)
commands.add(
    "Verify Pre-Flight",
    "Checks target dirs, pentests\n& based_on prerequisites",
    icon=phosphor.magnifying_glass,
)
commands.add(
    "Execute Primitives",
    "Auto-runs AST/Docker/Trivy\nValidates AI JSON schemas",
    icon=phosphor.arrows_left_right,
)
commands.add(
    "Deliver Artifacts",
    "Outputs *_score.json &\n7-chapter A4 vector PDF",
    badge_style=Styles.SuccessFlat,
    icon=phosphor.file_pdf,
)
commands.draw(xy=(3.0, 4.0), width=150.0, height=34.0)
save()
1. 前提条件とインストール
pni501 の実行には Python 3.11 以上(>=3.11)が必要です。また、隔離コンテナでのランタイム検証(run_check)、脆弱性スキャン(security_scan)、およびループバック Web ペネトレーションテスト(web_pentest)を実行する場合は、ホスト環境に Docker がインストールされている必要があります。
pip または uv を使用して PyPI から pni501 をインストールし、バージョンを確認します:
# 方法 A: pip でインストール
pip install pni501

# 方法 B: uv プロジェクトまたはツール環境に追加
uv add pni501

# インストールの確認と CLI サブコマンド一覧の表示
pni --version   # または: pni version
pni --help
2. ステップ 1:対象リポジトリで .pni/ を初期化する
評価対象となるリポジトリのルートディレクトリに移動し、pni init を実行します:
pni init
pni init はマニフェストファイル(pyproject.toml、pom.xml、build.gradle、composer.json、go.mod、package.json、tsconfig.json)から対象リポジトリの主言語(Python、Java、PHP、Go、TypeScript、JavaScript)を自動検出し、.pni/ ワークスペースディレクトリを生成します:
.pni/pni.toml— デフォルトの対象ディレクトリ([targets])および Drawlib レポート設定([report])を管理するプロジェクト設定ファイル。.pni/workflows/full_audit.yaml&quick_check.yaml— 自動検出された言語に対応するステートフルワークフロー定義(6言語の組み込みワークフローセット からコピー)。.pni/rules/&.pni/actions/— カスタムルールおよびコンポジットアクションのローカル上書き用ディレクトリ。.pni/instructions.md— Code AI Agent 向けのブートストラップ手順書。
3. ステップ 2:ターゲット設定の確認と Pre-Flight 準備ゲートの検証
ワークフローを開始する前に、.pni/workflows/<id>.yaml 内の targets.root、targets.source、targets.tests、targets.docs が実際のリポジトリ構造と一致していることを確認し、pni workflows show <id> を実行して正規化されたプリミティブステップと Pre-Flight 準備ゲートを検査します:
# ワークフロー一覧の表示と、正規化ステップ・Pre-Flight 状態の検査
pni workflows list
pni workflows show full_audit
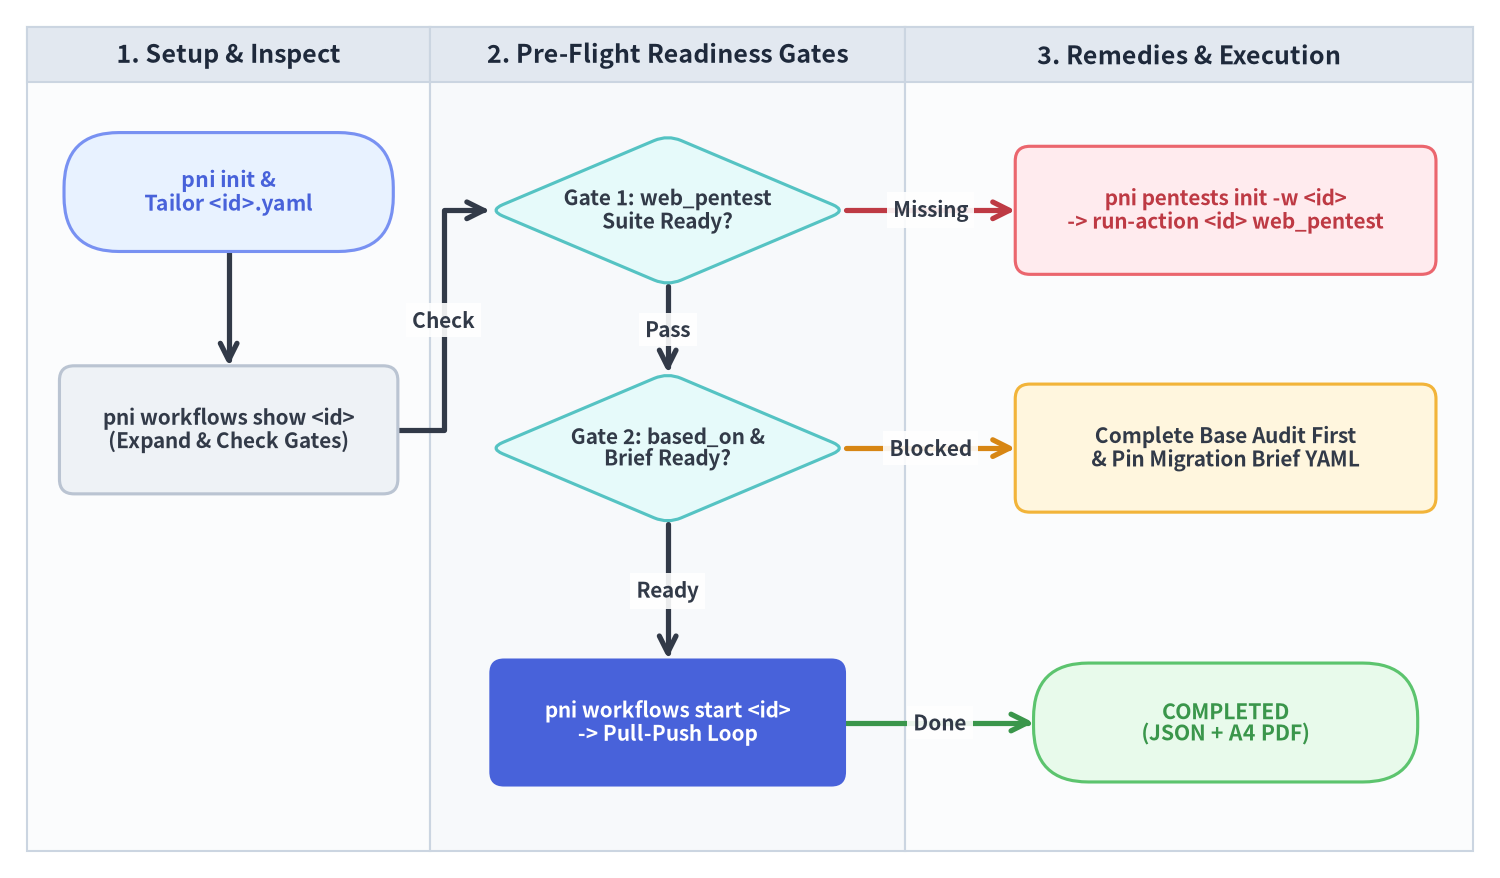
Source Code
from drawlib.canvas import save, setup
from drawlib.diagrams.flow import Decision, End, FlowDiagram, Process, Start
from drawlib.styles import Styles

setup(width=164, height=96, dpi=150)

flow = FlowDiagram(
    node_style=Styles.WhiteBordered.patch(
        text_color=Styles.Dark.text_color, shape_r=1.6, text_size=10.0
    ),
    edge_style=Styles.DarkBold,
    edge_text_style=Styles.DarkBold.patch(text_size=10.0),
    width=158.0,
    height=90.0,
)

flow.add_lane("1. Setup & Inspect", width=44.0)
flow.add_lane("2. Pre-Flight Readiness Gates", width=52.0)
flow.add_lane("3. Remedies & Execution", width=62.0)

n_init = flow.add(
    Start(
        "pni init &\nTailor <id>.yaml",
        width=36.0,
        height=13.0,
        style=Styles.PrimaryNeutral.patch(shape_r=6.0),
        text_style=Styles.PrimaryBold.patch(text_size=10.2),
    ),
    xy=(22.0, 72.0),
)

n_show = flow.add(
    Process(
        "pni workflows show <id>\n(Expand & Check Gates)",
        width=37.0,
        height=14.0,
        style=Styles.Neutral.patch(shape_r=1.6),
        text_style=Styles.DarkBold.patch(text_size=10.0),
    ),
    xy=(22.0, 46.0),
)

g_pentest = flow.add(
    Decision(
        "Gate 1: web_pentest\nSuite Ready?",
        width=39.0,
        height=16.5,
        style=Styles.SecondaryNeutral,
        text_style=Styles.DarkBold.patch(text_size=10.0),
    ),
    xy=(70.0, 70.0),
)

r_pentest = flow.add(
    Process(
        "pni pentests init -w <id>\n-> run-action <id> web_pentest",
        width=46.0,
        height=14.0,
        style=Styles.DangerNeutral.patch(shape_r=1.6),
        text_style=Styles.DangerBold.patch(text_size=10.0),
    ),
    xy=(131.0, 70.0),
)

g_based = flow.add(
    Decision(
        "Gate 2: based_on &\nBrief Ready?",
        width=39.0,
        height=16.5,
        style=Styles.SecondaryNeutral,
        text_style=Styles.DarkBold.patch(text_size=10.0),
    ),
    xy=(70.0, 44.0),
)

r_based = flow.add(
    Process(
        "Complete Base Audit First\n& Pin Migration Brief YAML",
        width=46.0,
        height=14.0,
        style=Styles.WarningNeutral.patch(shape_r=1.6),
        text_style=Styles.DarkBold.patch(text_size=10.0),
    ),
    xy=(131.0, 44.0),
)

n_start = flow.add(
    Process(
        "pni workflows start <id>\n-> Pull-Push Loop",
        width=39.0,
        height=14.0,
        style=Styles.PrimaryFlat.patch(shape_r=1.6),
        text_style=Styles.WhiteBold.patch(text_size=10.0),
    ),
    xy=(70.0, 14.0),
)

n_done = flow.add(
    End(
        "COMPLETED\n(JSON + A4 PDF)",
        width=42.0,
        height=13.0,
        style=Styles.SuccessNeutral.patch(shape_r=6.0),
        text_style=Styles.SuccessBold.patch(text_size=10.2),
    ),
    xy=(131.0, 14.0),
)

n_init.connect(n_show, start_side="bottom", end_side="top")
n_show.connect(g_pentest, label="Check", start_side="right", end_side="left")
g_pentest.connect(r_pentest, label="Missing", start_side="right", end_side="left", style=Styles.DangerBold)
g_pentest.connect(g_based, label="Pass", start_side="bottom", end_side="top")
g_based.connect(r_based, label="Blocked", start_side="right", end_side="left", style=Styles.WarningBold)
g_based.connect(n_start, label="Ready", start_side="bottom", end_side="top")
n_start.connect(n_done, label="Done", start_side="right", end_side="left", style=Styles.SuccessBold)

flow.draw(xy=(3.0, 3.0))
save()
ワークフローに動的 Web ペネトレーションテスト(uses: web_penetration_audit)が含まれる場合は、ステートフル実行を開始する前にペネトレーションテストスイートを初期化・単体検証します:
# .pni/pentests/<target>/ を生成し、SQLite 準備なしで単体ステップを直接テスト
pni pentests init -w full_audit
pni workflows run-action full_audit web_pentest
4. ステップ 3:ステートフル Pull-Push ループの実行
ワークフローを開始して .pni/cache/workflow_state.db にセッション(wf-<8hex>)を作成し、get-action と push-action を繰り返します:
# 1. ステートフルワークフローを開始(過去の未完了ランをキャンセルする場合は --supersede を付与)
pni workflows start full_audit --supersede

# 2. 現在のアクションを取得(決定論的アナライザを自動実行し、要求 JSON Schema を出力)
pni workflows get-action wf-1a2b3c4d

# 3. 現在のアクション ID (例: act-01) に対して検証済み AI JSON ペイロードを提出
pni workflows push-action wf-1a2b3c4d act-01 --file payload.json

# 4. 任意のタイミングでステップ進捗状況を確認
pni workflows status wf-1a2b3c4d
Pull-Push ループ中、エンジンは以下の処理を自動で行います:
- 決定論的プリミティブの自動実行:
get-actionがproject_inspect、ast_analyze、run_check、security_scan、web_pentest、migration_analyze、またはprogress_analyzeに到達すると、pniは即座に解析器を実行して.pni/cache/<workflow_id>/facts.jsonに結果を保存し、次の AI ステップへと進めます。 - Push 時の厳格なスキーマ・実在パス検証:
record_architecture、ai_interpret、emit_score、emit_migration_plan、emit_progressでは、push-actionが Pydantic モデル検証とmodule_inventory上のファイルパス実在確認を実施します。
5. ステップ 4:Drawlib ビジュアル PDF レポートのビルド
最終ステップの write_drawlib_report では、7章構成の Drawlib レポートプロジェクトを初期化し、座標グリッド(-g)による視覚検証を行った上で A4 ベクター PDF をビルドして完了報告を提出します:
# reports_src/full_audit_src/ を初期化し、reports/full_audit.pdf をコンパイル
pni report init full_audit --src-dir reports_src --lang en --style google
pni report build full_audit --src-dir reports_src --output-dir reports

# 最終完了ペイロードを提出してワークフローを COMPLETED に遷移
pni workflows push-action wf-1a2b3c4d act-12 '{"generated_files": ["reports/full_audit.pdf"], "summary": "Compiled 7-chapter A4 PDF report."}'
続いて 3つの主要ユースケース または ワークフローと Pre-Flight ゲート に進んでください。